If you're just getting started at the gym, identifying gym equipment can be overwhelming.
So to help untangle the confusion we have created this guide to help you understand the names and purposes of various gym equipment.
From barbells and dumbbells to resistance bands and cardio machines, we'll cover the essentials to enhance your workout knowledge.
Whether you're setting up a home gym or navigating a fitness center, this guide will ensure you know exactly what each piece of equipment is used for.
Strength Training Equipment
First, we want to take a look at a variety of strength training equipment which come in all shapes and sizes.
Power Cage or Squat Rack
First on the list of common pieces of strength training equipment you'll find at the gym is the power cage, also known as the squat rack.
This is a rack that has four posts, and it's used to perform a wide variety of barbell exercises. This includes the bench press, the squat, and others.
There might also be specialized squat stands that only have two vertical posts, but there are also larger cages that have 6 posts.
Between back squats, bench presses, shoulder presses, and a variety of other exercises, this is a very useful piece of strength training equipment. Power racks are usually around 48 inches long and up to 7.5 feet tall.
Barbell
Next is the barbell, which is a straight bar that is generally loaded with weight plates on either side. Barbells are used to perform a plethora of strength training maneuvers. Olympic barbells are the most common type but there are a variety of other bars such as safety squat bar, trap bar, powerlifting bars and more specialty bars as well.
These are great pieces of equipment because you can work out virtually every muscle in your body with them, and they're ideal for a variety of compound, isolation, and total body resistance training exercises.
Related Post: How much does an Olympic Barbell weigh?
Weight Plates
Next we have weight plates. Weight plates are those large and round plates that come in many different weights ranging all the way from 2.5 up to over 45lbs.
Weight plates are put on barbells and machines that require additional weight to perform exercises.
These plates can be made out of rubber, steel, iron, and other materials too. To use weight plates, you load them onto a plate loaded weight machine or a barbell. Any plate loaded or barbell-based movement can be done with weight plates.
There are typically two different sized holes with weights plates, Olympic which is 2" in diameter and standard which is 1".
Dumbbells
Dumbbells are one of the most common pieces of strength training equipment you'll find at the gym.
Dumbbells can be made out of rubber, metal, plastic, and other materials too. These feature two heads connected in the middle by a handle, and they can come in a wide variety of weights, all the way from one pound up to several hundred pounds.
Dumbbells can be used to perform a wide variety of exercises, so you can train virtually every muscle in your body.
Kettlebells
Kettlebells, as the name implies, look like a bell. They feature a large circular weight with a handle on top.
These are ideal for a variety of stability and conditioning exercises, as well as strength training.
Just like with dumbbells, kettle bells they can come in a wide variety of weights to suit people of all fitness levels.
Kettlebells can be used for a variety of movements, particularly full-body movements, with kettlebell swings being one of the best.
Resistance Bands
Resistance bands are elastic bands, usually made out of latex rubber. They can be used instead of kettlebells, dumbbells, and barbells.
They are great for resistance training, although more often used for warming up and rehabilitation purposes.
The bands generally have handles on each side so you can easily hold on to them. They can also be used to assist with exercises such as pull-ups. Resistance bands can be used to workout virtually every muscle in your body.
Weight Bench
Next on the list is the weight bench, which is an adjustable or flat bench that is used to support your body while you perform many different exercises.
You can adjust the bench to an upright position and down to a flat position, for a variety of upper body and lower body exercises.
Some models can also be adjusted to a decline. The beauty of a weight bench is that it is extremely versatile, and you can do virtually any type of exercise on one.
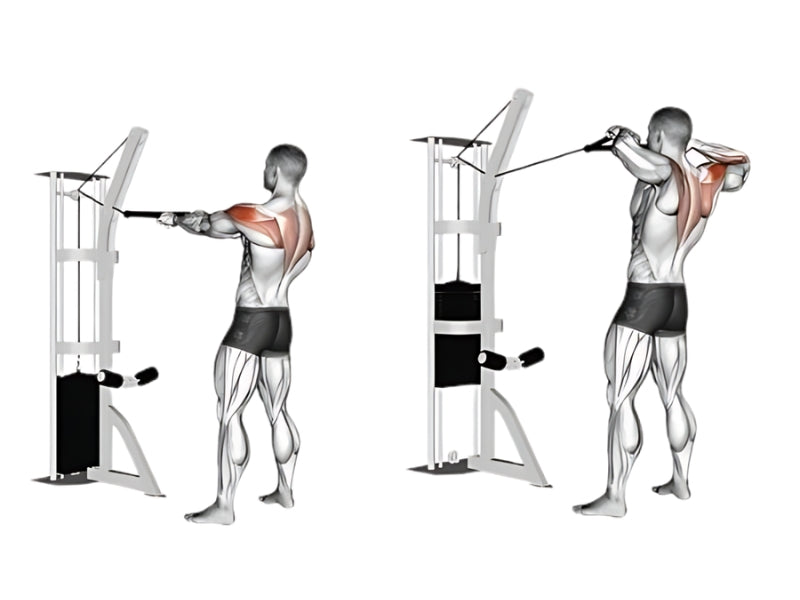
Functional Trainer
Generally speaking, a functional trainer is a freestanding cable machine which is also sometimes called a cable crossover machine. It's designed to recreate real-life movements, hence why it is called the functional trainer. Because functional trainers use pulleys, you might notice the weight doesn't always feel as heavy as the raw weight.
For instance, if you have 40 pounds selected on the weight stack, you might actually be lifting closer to 20 pounds if the machine has a 2:1 cable ratio.
However, the big benefit with these machines is that they provide you with consistent and constant resistance, allowing for great muscle engagement.
Lat Pulldown Machine
If you want to exercise your lats and back, then the lat pulldown machine is what you need.
This is a special strength training machine designed primarily to develop your back. It trains your rear delts, traps, lats, biceps, and more.
All you need to do is sit down, hold the handles with an overhand or underhand grip, and pull the bar down towards yourself.
If you want to grow a big and strong back, then this is the machine that you need.
Workout Mirror
As the name implies, a workout mirror is generally just a mirror that you use to look into as you work out. It's a great way to ensure that you are maintaining proper form.
However, there are also special workout mirrors that are smart in nature. This means that they act as both displays, therefore providing you with a great way to keep track of all the exercises that you are doing.
Suspension Trainers
Suspension trainers are simply a set of straps with stirrups or handles on the ends. These can be used to assist you when doing bodyweight exercises. The straps should be anchored to a wall or doorframe and and then adjust the length for whatever exercise you are doing.
You can then use the straps to help you balance when doing a wide variety of exercises such as biceps curls, rose, squats, and more.
These are suitable for a range of full-body resistance exercises without using any weights. These are suitable for everyone including beginners and the most advanced of exercise enthusiasts.
Reverse Hyperextension
The reverse hyperextension machine is a great one because it helps you decompress your spine. It's also used to improve the strength of your lower body. This is a machine that uses your hips, boots, hamstring, and lower back.
All you have to do is get on the machine with your stomach and chest laying on the pad, and your hip lined up with the bottom. Grip the handlebars, lift your legs, and then release. If you need to rehab your back from an injury or you just want to build a stronger back, then this is a great machine.
Landmine Attachment
The landmine attachment is designed to hold a barbell on a single end. These can be attached to power racks or placed in special holders in corners.
This allows the barbell to stay stationary on one end, while you can load the other end and lift it. If you want to do isolation movements like presses and rows, then this is a great piece of exercise equipment for you. It's also fantastic for training your core strength and stability.
Related Post: 7 Landmine Exercises to Try
Trap Bar
The trap bar is also known as a hex or hexagonal bar. This is a special barbell that looks like a hexagon, in which you stand inside of. It is used for deadlifts, but can also be used for shrubs and other such exercises.
It's a great piece of equipment to target your quadriceps, glutes, and hamstrings. All you have to do is load weight plates onto either end, and perform the exercises as you see fit.
Related Post: What Muscles Does a Trap Bar Deadlift Work?
EZ Curl Bar
The EZ curl bar Is a special type of barbell that features a W-shape. This provides the user with many different grip options. Thanks to those different grip options, it's a suitable type of barbell to perform many different upper body and arm exercises.
It's especially good because it takes a lot of stress off of your elbows, wrist, and shoulders, due to being able to place your hands in an ergonomic position. Just like with regular barbells, load up either end with as much weight as you see fit, and perform your exercises.
Dip Station
When it comes to improving the strength of your triceps, using the dip station is a great way to go.
A dip station consists of two separate U-shaped bars that you hold yourself up on. You then do what are known as dips, which is when you lift yourself up and down using your triceps.
Thanks to this, you can also count on this machine working your pectoral muscles, your anterior deltoids, and your abs. If you are looking to perform body weight exercises, then this is a piece of equipment for you.
Chest Press Machine
In terms of growing a bigger and stronger chest, the chest press machine is what you want to go for. This is a machine that mimics the bench press.
However, instead of sitting on a bench, you are in an upright position and pushing the weights in a forward and upward motion. If you don't want to have to deal with balancing a barbell, then this is a great alternative to the regular bench press.
Pull-Up Bar
Although not as common in gyms as they are in home environments, a pull-up bar is another piece of equipment that you should invest in. This is a special type of bar that you can mount in a doorway or on a wall.
As the name implies, it is designed to perform pull-ups. This means that it is ideal for training lats, pecs, triceps, biceps, core, and more. Just be sure to mount them properly, because you don't want to come crashing down to the ground.
Leg Press Machine
If you want to train your legs but you don't want to have to deal with squatting and all of the trouble that comes with it, then the leg press machine is for you.
The leg press machine has you in a seated position and pushing a stack of weight upwards.
It's a great way to train your whole lower body well without needing any kind of spotter or assistance. If you want lower body strength and balance, then this is the machine for you.
Leg Curl Machine
If you want to improve the strength of your calves and hamstrings, then the leg curl machine is worth checking out. This is a piece of weight training equipment that helps isolate both your hamstrings and your glutes. There are both lying and seated versions of the leg curl machine.
Leg Extension Machine
On the other hand, we have the leg extension machine. The leg extension machine is designed to isolate your quadriceps. Here, you sit on a chair with your shins behind a pad.
You then push the pad upwards until your legs are perfectly straight and extended, therefore working out your quadriceps. When it comes to isolation exercises for your quads, this is one of the best pieces of equipment at your disposal.
Smith Machine
Next on the list of strength training equipment, we have the Smith machine. This is more or less a safety system for barbell exercises. The barbell is attached to a track, and it comes complete with safety stops.
This means that you can perform a wide variety of barbell exercises, whether squats, bench presses, shoulder presses, calf raises, or anything in between, without the need for a spotter. It's a great piece of equipment for anybody who wants to build full body strength without any outside assistance.
Related Post: Calculate a Smith Machines Bar Weight
Preacher Curl Bench
If you're looking to build the strength of your biceps, then the preacher curl bench is a great one to consider.
It's a good option because it allows you to perform biceps curls without putting too much strain on your elbows or other parts of your body.
If you have elbow issues, then this is an especially beneficial machine to use.
Plyo Boxes
Plyometric boxes are special types of boxes used to perform many different exercises such as raises, dips, box jumps, step ups, and more.
Plyo boxes can usually be adjusted for height or stacked on top of each other. These are best used to increase your jumping ability, although they are ideal for a variety of explosive strength training exercises.
Glute-Ham Developer
Finally, we have the glute-ham developer. This large piece of gym equipment is designed specifically to train your hamstrings and glutes from a prone position.
All you have to do is anchor your feet in the foot pads and footplate, lay face down on the pads, and then perform any type of glute or hamstring exercises as you see fit.
Cardiovascular and Conditioning Equipment
Of course, the gym isn't just home to strength training machines and tools, but to cardiovascular equipment too.
Let's find out what some of the most commonly used pieces of cardiovascular training equipment in the gym are.
Treadmill
A treadmill is a piece of cardiovascular exercise equipment that you stand on. It is designed for walking, running, and jogging. For some people, it's even meant for sprinting.
It's a great way to keep your cardiovascular system in great shape while also exercising your lower body. It's a great piece of equipment for people of all fitness levels. With that being said, it's not particularly low-impact.
Elliptical Machine/ Cross Trainer
Speaking of low-impact, if you are looking for a great lower body workout that involves your cardiovascular system, then the elliptical cross trainer machine is worth considering.
An elliptical machine has you working out in a gliding motion as opposed to a walking motion.
There is never any impact put on your knees, which makes it a great exercise for anybody who wants to engage in cardiovascular training without all of the impact involved in running.
Exercise Bike
Next on the list, we have the exercise bike. This is a stationary piece of exercise equipment. These can be upright bikes, spinning bikes, or recumbent bikes where you sit down.
These are great pieces of equipment to train your cardiovascular endurance, while also exercising your lower body, mainly your glutes, hamstrings, quads, and caps, along with your core. This is a nice type of exercise for anybody who needs low-impact cardiovascular training.
Air Bikes
A very interesting piece of cardiovascular exercise equipment is the air bike. This is a special type of stationary bike that is powered by the user alone.
The more you pedal, the more air resistance there is, and the harder it gets. Whether you want to do some low impact cardio, recovery workout, or some high intensity interval training, the air bike is a good way to go.
Rowers
If you want a fantastic full-body workout, but something especially great for your upper body, then the rower or rowing machine is for you.
This is a piece of cardiovascular exercise equipment that is meant to recreate the traditional movement of rowing on water.
It is an exercise that trains virtually every muscle in your body, it is extremely intensive in terms of cardiovascular output, yet is still low-impact.
Climbers
We then have the climber, which is designed to mimic rock climbing. This is an indoor cardiovascular exercise machine that recreates the movement of climbing up a vertical wall.
It's an ideal exercise for both your upper body and your legs. If you want to add something interesting to your workout routine, then this is definitely something worth trying.
Stair Stepper
If you like climbing upwards, then the stair stepper might be the right machine for you. As the name implies, this is a piece of cardiovascular exercise equipment that looks like a staircase.
It mimics the natural motion of you walking upstairs. It's a great piece of equipment to exercise your whole lower body. It helps to build aerobic capacity and muscle endurance, plus it's low impact as well.
Jump Rope
A jump rope is simply a rope or cable with handles. They are made out of rope, plastic, rubber, or other such materials. They are suitable for skipping rope, and for a variety of specialized rope skipping techniques.
Ski Erg
The ski erg is perhaps one of the most interesting cardiovascular exercise machines at the gym. It's very similar to the rowing machine, but it is in an upright position.
It's designed to recreate cross country skiing. It works out primarily the core and upper body, but your legs as well. If you're looking for a cardio workout that trains your arms, then it's a great one to check out.
Functional Training Equipment
Sleds
Sleds are a special piece of equipment that you can load weighted plates onto. Sleds are designed to be pushed and pulled along.
They are therefore great for developing both pushing and pulling strength, particularly in your lower body. If you need to increase the strength of your legs, then this is a piece of equipment that you need.
Medicine Ball
A medicine ball is a large type of inflatable ball. This can be made out of various materials. They might be soft or hard. They are ideal for performing a variety of weighted exercises such as lunges, squats, rows, presses, or anything else of this sort. In a certain way, medicine balls replace kettlebells.
Weighted Vest
A weighted vest is always a great piece of equipment to have on hand. This is a special type of vest that features pockets that you can put specialized weights into.
This puts a whole lot of weight on your body. This therefore makes body weight and cardiovascular exercises of all sorts much more difficult and intensive.
Peg Board
A pegboard is a large wooden board that is usually mounted to a wall. Holes are cut into it, into which special pegs can be inserted. Take the pegs and use them to climb up the entire wall. It helps to build both strength and cardiovascular endurance.
Battle Ropes
Last but not least, we have battle routes. These are very heavy ropes that you attach to an anchored point. You then move your arms and then up and down motion while holding the ropes. It's great for working out your upper body and other muscle groups, while also engaging your cardiovascular system.
Rounding Up
The reality here is that we have really just touched the tip of the iceberg with these gym equipment names. With that being said, these are some of the most commonly used ones.
Start familiarizing yourself with all of the different pieces of exercise equipment at the gym, whether strength or cardiovascular, and choose which ones are best for you.
]]>